

Buy ProductsDistributors     |
Maker Faire 2009
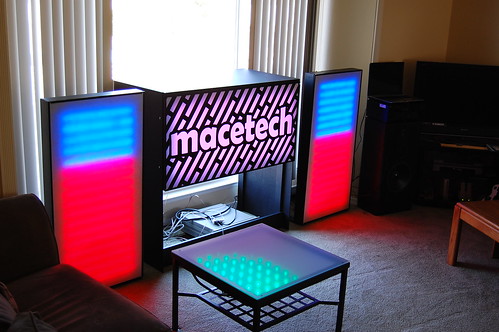
It's been a while since I made an update here, but things have been really busy. Had some supplier issues with a bunch of new products, lots of work to do on Maker Faire projects, random other daily crises. Oh...a day job too. But the Maker Faire is only a few days away, and things are finally shaping up. The giant VU meters and front sign/desk are working, the coffee table is working, the giant MegaBrite wall requires only a few more steps to completion. Didn't help that we had none of the electronics until late last week, when we were supposed to have them no later than the 15th. But John at OurPCB really stepped up and fixed the assembly scheduling issue, getting us what we needed on time and worrying about the other stuff later. Here's a photo of the stuff we've got running so far (not counting some smaller tabletop projects): Valerie gave us a booth in a darker area of the main Expo Hall. This is great, our LEDs won't look as amazing as they would in the Dark Room (a building with no lights on), but the lights in this section are typically dimmed. The reason is a little dismaying...it's where they set up the pair of 20 foot Tesla coils, shooting 20 foot arcs of lightning between them every hour. Last year, I wasn't alone in having my electronics negatively affected by Tesla coils, and those were only a couple feet tall. It will definitely be...interesting. Submitted by Garrett on Wed, 05/27/2009 - 02:03. Capslocker RebuildThis project is mainly about my new build process, which I used to create a single sided PCB for a rebuild of the Capslocker project from last year. Instead of using a laser printer to create an iron-on resist pattern, I'll cover a whole PCB in resist and then use a laser cutter to etch off the resist. First, I created a new design in Eagle. I wanted this version of the Capslocker to be a little easier to program and adjust, so I added a potentiometer and a 6-pin AVR ISP header. It makes the device a bit bigger, but really makes it easy to modify the code. Next, I lightly spray painted some single sided copper clad PCB material from Jameco. The best paint I've found is Rust-Oleum "Painter's Touch" flat black spray paint. It dries in about 20 minutes. The laser cutter I'm using is a 45 watt Epilog, one of two currently available at Techshop in Menlo Park. I set up the spray painted copper clad on the laser table and focused it as precisely as possible. A sharp beam is essential to getting a precision resist mask. Then I printed-to-file using a postscript driver, imported that file into Corel, converted to a 1200x1200 DPI bitmap, and inverted. I set the laser to 50% speed and 40% power, raster mode, bottom-up etching. It can be a good idea to print two copies since the second pass cleans up paint residue a lot, but it's not required. Submitted by Garrett on Wed, 04/01/2009 - 23:47. AF_XPort and lighttpdRecently I was building a project for a client, who needed an internet-controlled display device. For quick development time and minimal budget, I selected an Arduino Duemilanove, XPort Shield, and XPort Direct from Lady Ada's Adafruit store. Soldered everything together, tested and configured the XPort, everything worked. Then I wrote the necessary code to request data from a web server, that all worked too. Finally I took the project down to the client's office in Mountain View and set it up...didn't work. I ended up working on the project for about four hours trying to get it running (minus some tricky subnet issues...use increments of 8 bits on an XPort). The client was using lighttpd to serve the display data, and I had been using Apache for testing. HTTP is HTTP, right? It should work on either? It didn't. I set up an Apache server on my laptop and everything worked great...point the Arduino sketch back at the client server, nothing worked. I kept getting "501 - Not Implemented" errors from the web server. If I opened up a telnet session directly to the web server and manually typed in the request the Arduino was sending, it worked. Submitted by Garrett on Tue, 03/17/2009 - 17:19. Awesome ShiftBrite KITT"my05stang" has installed the full ShiftBrite bar in his Mustang and posted a new video! Looking great....he's going to experiment with different colors and speeds, as well as check into diffuser solution. But at this point, it looks great. Good job! Submitted by Garrett on Fri, 02/13/2009 - 20:54. ShiftBrite Roundup MegapostA lot of ShiftBrite modules are out there now, and occasionally someone will post a few pictures on their website or some videos of their latest project. Here's some of the projects I ran across that I thought were pretty awesome: Altoona Lights:
Nick over at AltoonaLights.com thought that ShiftBrites might be an interesting addition to the DoItYourselfChrismas community. He has been rigging his house with computer-controlled Christmas lights, synchronized to music. One of the more popular pieces of control software for home displays is called Vixen Lights, and Nick decided to jump into C# programming to create a ShiftBrite plugin for Vixen. His code currently uses a parallel port to output the serial data and control lines. His ShiftBrite page includes lots of protocol analysis, pinouts, source code, and demo videos (I should probably take a hint from this). LED technology is becoming increasingly popular with animated display builders, since they are straightforward to control and dim, have a long life, and in some installations don't require dangerous voltages. Read more» Submitted by Garrett on Tue, 01/27/2009 - 21:59. Quick cable tester
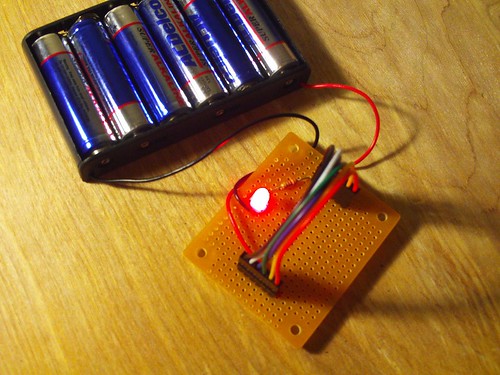
I got a batch of cables that had a few bad wires in them, so I needed to test every cable. Checking all the wires with a multimeter was out, so I built this simple cable tester out of a proto board, some headers, an LED, a resistor, and some wire. It just completes a circuit through all the wires in a cable; if any wire is bad, the LED will not light. Simple concept, but it allowed me to test about 300 cables in about half an hour. A video of a few cable tests is below:
Submitted by Garrett on Mon, 01/12/2009 - 22:54. ShiftKnight
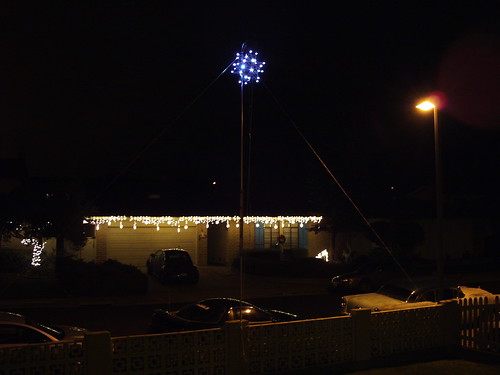
I got some custom headers for use in Arduino shields today, and tested them out tonight. Seems to be pretty much ideal. After the soldering, I decided to attack a problem that a customer asked me about. He's working on a Mustang and wants to use ShiftBrites to make a Knight Rider style scanner (2008 TV show version). I wrote some code, it allows any chain length divisible by two, any solid or mixed color, and custom leading and trailing gradients. Here's the relevant post on the Arduino forum. A YouTube video is below: Update: I moved the controller to a larger LED bar and updated the code a little bit: Read more» Submitted by Garrett on Sat, 01/10/2009 - 05:58. New Years Ball is ReadyI flew back home today and immediately started rigging the ball (click here for the article about the ball) drop system for tonight. Here's the pole right after I set it up:
And here's the ball run up to the top and ready to rock:
The pole is made of two 10-foot pieces of 3/4" EMT and is guyed with nylon twine. A couple of pulleys let me raise and lower the ball on more twine. It will run through a sequence right after powerup, then go to a slow fade. The ball is made of drinking straws and ShiftBrites, and powered by an Arduino.
Submitted by Garrett on Wed, 12/31/2008 - 19:19. Ball of WinI thought it would be fun to make my own version of the Times Square ball drop for New Year's Eve. Maybe later I'll build something like this: http://www.timessquarenyc.org/nye/nye_ball.html ... but for now I'll have to go with 32 LEDs instead of 32,256, and drinking straws instead of Waterford crystal. The straw icosahedron first stellation (small triambic icosahedron) was actually built a couple of years ago when I had a package of straws and no job. I simply strapped a bunch of ShiftBrites to it. Submitted by Garrett on Wed, 12/24/2008 - 09:48. |
Cool Links 
|


Recent Comments
5 years 2 weeks ago
5 years 2 weeks ago
5 years 4 weeks ago
5 years 11 weeks ago
5 years 18 weeks ago
5 years 19 weeks ago
5 years 23 weeks ago
5 years 23 weeks ago
5 years 26 weeks ago
5 years 32 weeks ago