

Buy ProductsDistributors     |
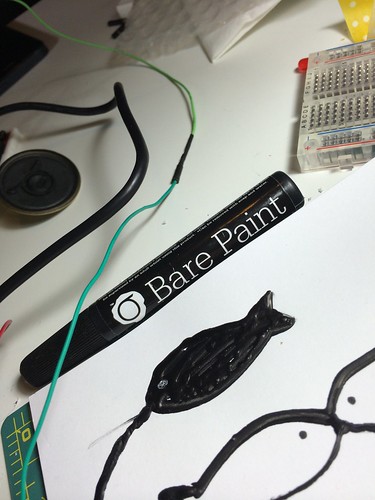
Musical Fish (MSP430 Captouch & Bare Conductive Paint)This is a short article demonstrating an experiment with Bare conductive ink and the MSP430's capacitive sensing hardware. I've experimented with various capacitive sense methods previously; the most common uses one pin to charge up an electrode, while using another pin to measure the amount of time needed to charge up to the logic high threshold level of an input pin. A couple of similar approaches are illustrated here: http://www.ti.com/lit/an/slaa363a/slaa363a.pdf An alternate method is available on several of the MSP430 value line microcontrollers (G2xx2, G2xx3, FR58xx, FR59xx). In addition to the typical pin peripheral functions, they include a relaxation oscillator circuit that includes pin capacitance to set the frequency. By measuring the number of oscillations in a given time period, a small change in capacitance can be measured...enough to detect whether a finger is touching an electrode.
Bare Conductive makes a carbon-bearing paint that is fairly conductive, and available in pen form. Combined with capacitive sensing, it is possible to draw an interface on a sheet of paper, and use it as input to a microcontroller. For this experiment, we used it to play a few notes from a speaker and make a very basic piano-like instrument.
Submitted by Garrett on Sun, 01/19/2014 - 13:58. Dallas Makerspace
In the SF Bay Area, I had access to a number of places (TechShop, Noisebridge, Hacker Dojo) to work on projects that weren't appropriate for my garage or a spare bedroom. Tools like engine lathes and laser cutters are expensive to own, bulky, and require the proper infrastructure. It's also good to have a place to meet with like-minded people and share ideas. I just moved to Dallas and hoped to find something similar. The nearest TechShop is about three hours away, in Austin. So I decided to check out the local Dallas Makerspace. They seem to hold a middle ground between a typical hackerspace and a corporate-run workshop like TechShop. Hackerspaces usually attempt to remain completely open to the public, and shy away from creating rules whenever possible. This leads to a more intense environment where amazing things can rise from the chaos, but often leads to conflicts and drama. TechShops have a very strong divide between members and employees, and require adhering to a set of rules and certifications in order to use the equipment. Dallas Makerspace seems to have achieved an interesting midpoint where the feeling of members creating the space is still there, but many problems are forestalled by a small set of rules regarding the space, member behavior, and equipment.
Submitted by Garrett on Sun, 01/12/2014 - 21:58. LEDs and Tacos: macetech's new home in 2014Last month, we announced that we'd be moving from California to Texas. I'm happy to report that the move was successful, and macetech is already resuming operations and shipping orders! Most of the macetech activities are now located in Garland, TX; a city on the eastern outskirts of Dallas. We're hoping that the Midwestern location will improve shipping speeds for more of the USA, while reducing operating costs. We'll miss Foster City's great weather and proximity to Maker Faire, but enjoy some truly excellent brisket taco shops! All without having to give up In-N-Out. We rented a 26' moving truck and did the driving with the help of our friends Matt and Karl. Our route took us over I-10 to avoid bad weather and some of the mountains...as it was, the truck struggled to maintain 35mph over some of the steeper hills. The total route was about 1850 miles and took us three days of driving. The only adventures were a radiator leak in the Jeep, and an RV driver at a truck stop who tried to convince us it was necessary to lay one of the fuel nozzles on the ground if we didn't have two diesel tanks. Mostly hours of intense boredom with occasional moments of weirdness.
No Instagram filter there, just an old Polaroid camera and expired film. We're unpacking the macetech store stock and prototyping lab, and expect to have plenty of new and exciting projects to show off soon. First, the main question everyone has: yes, we'll be making more LED Shades. We'll also be increasing the selection of colors, and have other improvements and variations in the pipeline.
Submitted by Garrett on Mon, 12/30/2013 - 01:24. Macetech Moving Sale
Macetech will be moving from our location in Foster City, CA to a new location in Dallas, TX during December. In order to reduce amount of stock we need to transport, we're discounting nearly every item in our online store...many items 20-30% or more. Every cable is 30% off. Please note that we'll be closed and can't ship orders during the week of Thanksgiving, and after December 11th until further notice. We expect to be fully operational by December 20th at the latest. Thanks!
Submitted by Garrett on Sat, 11/16/2013 - 17:39. LED Shades Launch: Maker Faire Bay Area 2013Maker Faire Bay Area 2013 was my seventh Maker Faire as an exhibitor, and macetech's fifth year. No matter how many times we go, we are never prepared for the huge amount of creativity and curiosity crammed into every inch of the fairgrounds. This year, we launched the LED Shades that we've been working on for quite some time. We demonstrated a prototype last year at Maker Faire, and due to all the other projects we've been doing, it took quite a while to finalize the design to a point we felt comfortable selling them. Here's the final product: Read more» Submitted by Garrett on Wed, 05/29/2013 - 20:36. LED Glasses: The Journey ContinuesWow! It's been so busy around here, we haven't had time to update the blog recently. Thought we'd update everyone on the LED glasses project. First of all: soon. We want to make sure they're durable and thoroughly awesome, and a lot of other projects and work have been keeping us far too busy while Garrett transitions to full-time at macetech. Waaaaay back in May 2012, we unveiled the newest macetech product at Maker Faire: LED shades!
We hoped to finish up development and release them within a month or two of Maker Faire, but quickly discovered some issues with the design. The first was an electronic problem that was solved by switching to alternate transistors row drivers and control chips. The next was a more subtle, yet crippling problem. It's easy to design something that sits on a shelf and operates forever, but anything worn by people is subject to a lot of stress. We found that our QFN driver ICs were actually breaking internally due to board flex! Solving that problem has required a lot of revision and testing. Submitted by Garrett on Sun, 03/03/2013 - 20:17. WS2811 LED Pixel HatI made this for New Year's Eve. It has 114 RGB pixels and an MSGEQ7 chip to analyze audio. The pixels are all turned down to 51 max brightness (out of 255). I used an Arduino to control the pixels in one continuous chain, and a USB battery pack for power. Submitted by Garrett on Sun, 01/06/2013 - 13:44. Maker Faire Bay Area 2012 Countdown TimerGreat news! The Call for Makers has been launched for Maker Faire Bay Area 2012. We're excited and apprehensive at the same time...the days seem to melt away in the months before Maker Faire. The Maker Faire site has a nice countdown timer, and we wanted to duplicate that so we could always keep an eye on the dwindling time. So we did it...in style! Check out the video below: A big Betabrite LED sign (scored from Silicon Valley Electronics Flea Market) receives serial data from an Arduino. The Arduino is keeping track of the difference in time between now and 10:00 AM on May 19th, 2012. Since the Arduino by itself would quickly drift into the meaningless voids of time, we have a ChronoDot installed to keep everything precise. The very handy Time Library by Michael Margolis works as-is with the ChronoDot, and also provides some handy data structures to help do the necessary math. Here are a few technical details: The ChronoDot is wired to the Arduino on the following pins:
Submitted by Garrett on Fri, 02/10/2012 - 02:56. Homemade New Year's Eve LED Ball Drops(This article was supposed to be written a lot earlier, but food poisoning had a discouraging effect on the author.) Every New Year's Eve, up to a million visitors crowd Times Square NYC to see a massive crystal and LED ball descend at the stroke of midnight. The ball has grown increasingly large and complex over the past few years, now 12 feet in diameter and over 32,000 LEDs. While an impressive sight, it's not easy to drop by Times Square when you live on the West Coast. And seeing the ball drop on TV, 3 hours early, just isn't the same. So why not build your own LED ball? Dropping our own LED ball is a 4-year macetech LLC tradition (well, four drops, and three elapsed years to be precise). The first ShiftBrite LED Modules were produced in early 2008. By the end of 2008, we were doing higher volume production and had founded a new company, macetech LLC. ShiftBrites are a small PCB with an RGB LED and a PWM controller, capable of 1023 levels of brightness for each of the red, green, and blue channels. They can be chained together with 6-pin cables, and sent color commands by a microcontroller. Only 4 data pins are needed to fully control up to 255 pixels in a single chain.
Submitted by Garrett on Fri, 12/30/2011 - 03:17. mtAtmo: Insanely Bright 60W LED Backlight for a 58" Plasma ScreenEver since Philips released their Ambilight enabled televisions, hackers around the world have gone "ooooh, cool" and then immediately "how can I build that?" If you're not familiar with the concept, it's basically a light source that surrounds a display screen. It's not a new idea...many very old televisions had a white "halo" around the screen both to make the screen seem bigger, and to reduce eyestrain. Flat panel televisions are usually mounted on or near a wall, so the idea of putting a glow on the surrounding wall was born. Philips improved on the idea by building a processor into their TVs that analyzes the signal and adjusts a ring of LEDs to match colors. Supposedly this increases immersion and reduces eyestrain...but we all know it just looks really cool. DIY Ambilight-style setups have been around for years. One of the more popular video viewing programs, VLC, even ships with a plugin to control external LED hardware. Many purpose-built devices and DIY designs exist too. But you can use general-purpose controllers, like an Arduino, with general-purpose LED modules. Here are a few easy to build projects (some of which are pretty recent): Read more» Submitted by Garrett on Tue, 10/25/2011 - 22:21. |
Cool Links 
|


Recent Comments
5 years 2 weeks ago
5 years 2 weeks ago
5 years 4 weeks ago
5 years 11 weeks ago
5 years 18 weeks ago
5 years 19 weeks ago
5 years 23 weeks ago
5 years 23 weeks ago
5 years 26 weeks ago
5 years 32 weeks ago