

Buy ProductsDistributors     |
Viking Helmet with OctoBrite Fiber Optic RGB LED MohawkA friend sprung this project on us at nearly the last minute...he wanted a light-up mohawk on his Viking helmet. Fortunately he already had the helmet, and we already had plenty of LEDs and raw materials. PlanningThe main obstacle turned out to be the fiber optics. We discussed several options; it's pretty easy to locate bulk art-grade fiber optic spools, but cutting a few thousand fibers didn't sound like a feasible task considering less than a week remaining (plus lots of other tasks demanding spare time after work). And we had no way to easily tell how stiff the fiber was, or if it would try to curl up.I remembered seeing street vendors selling light-up wands with fiber optics. They proved to be a cheap source of premade fiber bundles of the correct length and stiffness, already clamped into a handy ferrule. I didn't have time to hunt down a street vendor, so found a source of cheap bulk wands at FlashingBlinkyLights.com. The price for just the optics was acceptable, not even counting the rest of the handle, batteries, LEDs, etc. This needed to be compact, and the helmet needed to be audio reactive too, so I also grabbed some parts from Sparkfun: Arduino Pro Mini, Electret Mic Breakout, and MSGEQ7 Spectrum Analyzer. Also needed a tiny case and some battery holders, got those from Jameco. The LEDs were easy...four OctoBrite CYANEA modules. Each module has eight bright RGB LEDs, and each color of each LED is controlled with 12 bit PWM. I wanted to connect one LED per fiber bundle, so the final result would be 32 pixels of 36 bit color, configured as a dual row of fiber optic "spikes". BuildingOff to TechShop with all the parts and special tools! I reserved some laser cutter time, because I knew this would require some precise custom assembly.I cut up the LED wands and extracted the juicy fiber optics within, then started arranging them in possible configurations.
Also did a quick test with an OctoBrite, to make sure the color mixing and brightness were acceptable. Looked great!
Next step was taking a piece of poster board, casting a shadow from a side view of the helmet, sketching an outline and then cutting and trimming to fit. Then I chose locations for OctoBrites and positioned the fiber bundles in the final configuration.
More marking and sketching, and the final outline of the structure was complete. I took this photo from directly above the poster board, imported it into Inkscape, and adjusted the scale until it was 1:1 correct. Then I traced over the sketch with outlines, and added details like slots for the OctoBrites, holes for bolts, cutouts to clamp the fiber optics, etc. I ended up with seven layers of plastic for the laser cutter.
First test with some of the laser cut parts! The OctoBrites are housed in a thick piece of clear plastic that spaces the fiber bundles correctly, and also acts as a light pipe from the straight-line OctoBrite to the curved array of fiber bundles.
Fit test with all the layers in place. The outer clear layers were later painted silver to (sort of) match the helmet.
There are 40 of these little custom laser cut washers glued in place, spacing everything correctly.
Photo of a full arc of fiber bundles tacked in place with hot glue, and two OctoBrites in the optic layer.
The control box was a pain, but such things usually are. There was barely enough room for the parts and wires I was using...and it turned out that the electret amp was picking up too much supply noise from the LEDs, so I needed to add some RC filters, leaving one capacitor hanging outside the case. Anyway, the Arduino Pro Mini is at the bottom, and the MSGEQ7 is mounted on a piece of proto board. I'm using a trimpot to adjust the signal level running into the chip, to account for varying ambient noise levels. The tactile switch is used to select different display modes.
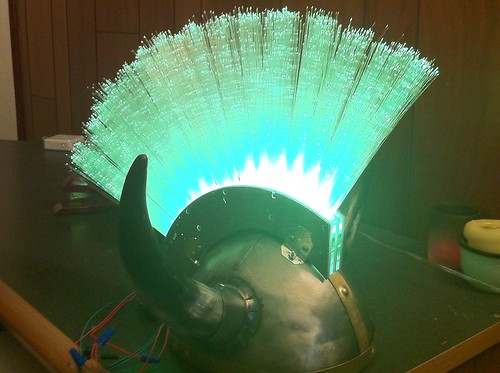
Final mohawk assembly! Here's a side and bottom view.
And here's the mohawk mounted on the helmet. The horns are hollowed out, and 4xAAA batteries are in each horn!
It's alive! Nice and bright! Then I had to write the code...always takes longer than you think. But I had everything running over the weekend.
The video of all the modes running is back at the top of the article. A friend of the friend picked up the helmet Tuesday morning. There was no time to get feedback and modify the code beforehand, but I think he likes it. Got a message from the playa this morning:
Submitted by Garrett on Wed, 08/31/2011 - 18:27. |
Cool Links 
Recent Comments
|


A Native American/Medieval
A Native American/Medieval Scandinavian headdress--??? Dude, you should have modeled it. And I want some hair extensions like that. But, again...control box.
Where is a good place to
Where is a good place to start to learn how to do something like this? How did you write the program for the Arduino? Thanks.
Hello, any chance to see
Hello, any chance to see some detailed schematics and the Arduino code? :)
Yeah, I'd really love to
Yeah, I'd really love to pick apart your code. Any possibility you could post it?
Wow nice work I have been
Wow nice work I have been working with Netduino but man I am going to change now
all you folks asking for code check out the sample code its on the link he provided
http://docs.macetech.com/doku.php/octobrite
Did you happen to keep your
Did you happen to keep your files for the laser cutter, to cut out all the plastic parts? I own a laser cutter and would love to try to put one of these together :)
Garrett, I happen to have
Garrett,
I happen to have an unhealthy obsession with Vikings. How much money do I have to throw at you to get one of these?
Thanks for finding my helmet
Thanks for finding my helmet - I lost it at the 2005 Love Parade. Can I drop by and pick it up?
hello, im bree , my father
hello, im bree , my father is looking for a lighted up mohawk like yours. my had has mohawk that is 10 inches tall & the guy at work witch is dancing with the stars, they want him to put a mohawk on a work helment (hard hat) on stage. hes not a computer person but if u would like to give him a call about this matter please call (661) 361-0111 in LA. he came to me to help find a mohawk for his helment & yours looks the best. so if u can please call him back his name is ken or e-mail at
thank you for your time . (:
dude if you are selling this
dude if you are selling this diy please contact me on