

Buy ProductsDistributors     |
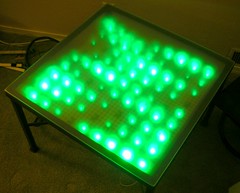
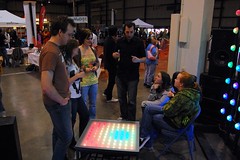
Live Twitter Table using New Bluetooth ShieldIntroductionWaaaaaay back in 2009, we took a coffee/side table from IKEA and wired it with 81 ShiftBrite RGB modules in a 9x9 grid. We took it to Maker Faire Bay Area 2009 and showed it off to thousands of people. However, we never managed to put together some detailed documentation, beyond a few photos.Well, we've decided to revisit the project and show a bit more of how the table is constructed, and maybe give you a few ideas for your own LED table project. Additionally, we've added macetech's new Bluetooth shield functionality and hooked it up to Twitter! By correctly formatting your tweet and including the #ledtable hashtag, you can help create an ever-changing work of art in our living room. Control the Table Simply post a tweet including the hashtag #ledtable and use the following pixel definition format:
#ledtable 0,3,red; 1,2,green; 4,4,#FD2245; In other words, the first two numbers are x and y coordinates (0 through 8 allowed) and then the pixel color. You can specify a color in HTML format or just use a named color from the below:
The numerical and color values must be separated by commas, and each pixel definition must be ended with a semicolon. The #ledtable hashtag can be anywhere in the tweet, and you can define as many pixels as will fit in the tweet. Whitespace and additional text is not a problem.
We've just got word that some fans helped set up a tweet generator application for the LED table. Check it out here! Thanks to chicklets921 for creating the generator and MikeCyberMe for setting up the hosting. There have been some really cool pictures drawn on the table, but this should help make it a lot easier. Thanks! Live StreamYou can watch the results live on UStream below (if we have the table running at the moment). Unless you want to go to Ustream's page, just click on the little ">" arrow in the lower left corner instead of the big one in the middle of the video.Table ConstructionAnd here's how we built it!First of all, here are some photos of the coffee table as previously implemented: The coffee table is actually a GRANÅS series steel and glass side table from IKEA. Unfortunately they don't make this exact table any more, but if you wanted to duplicate the project you might find a used one. Or just use a completely different table! All it takes is a little measuring. 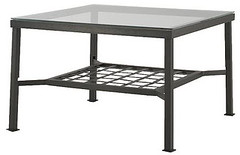 The first thing I did was measure the table as accurately as I could, then create a 3D model of it in Sketchup. 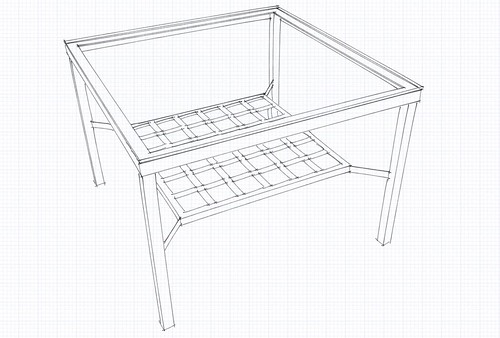 Next, I made some decisions about the LED spacing, and drew up a plan for a wooden tray that would fit under the table's angle iron frame. You might notice this drawing shows 64 ShiftBrites instead of 81...that was the original plan, but later on you'll see why the configuration changed. 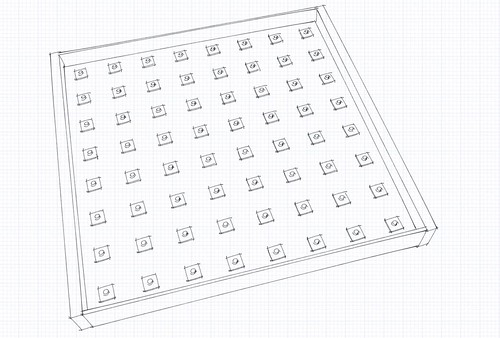 Putting it together (and turning off the sketchy look) we get a good idea of how the final project will look: 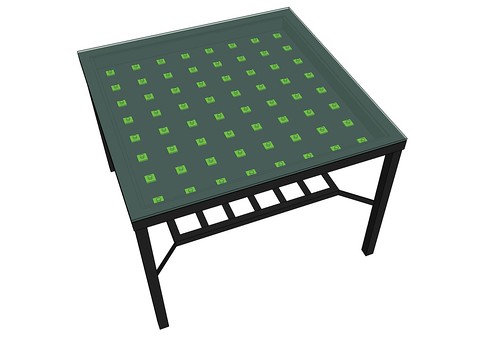 All that remained was to extract the measurements from Sketchup and build it! The thin side panels are 1/4" plywood and the thicker mounting panels are 1x3 lumber. Not shown in the drawing are some square 3/4" dowel along the inside corners to allow assembly with screws. Mounting the tray to the table was pretty easy. I used a neat trick that allows the tray to be easily installed and removed, without modifying the actual table frame at all. I had some 8 pound pull super magnets from the Silicon Valley Electronics Flea Market. Drilled four shallow holes in the edges of the 1x3 panels, squeezed in some epoxy glue and dropped in the magnets. 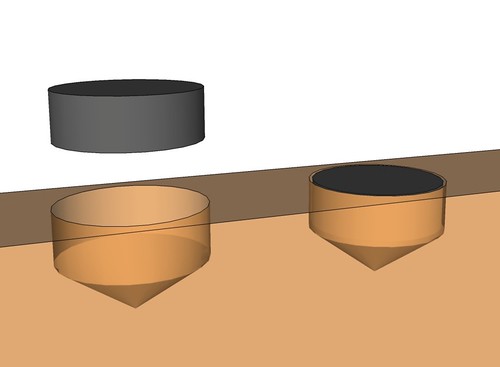 I discovered that ShiftBrites attach pretty easily to the plastic grid lighting louver from Home Depot. It's normally used in overhead fluorescent lighting. Due to the spacing of the grid, the only way to get a symmetric arrangement was use a 9x9 grid instead of an 8x8 grid. This has a few other advantages; it's possible to put a pixel in the exact center of the grid, for example. 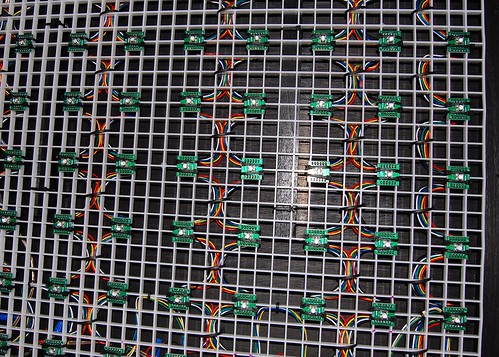 The ShiftBrites are wired in a long chain that zigzags across the table. Power is wired into various points since the full power of the array shouldn't go through the cables and traces of the first ShiftBrites. 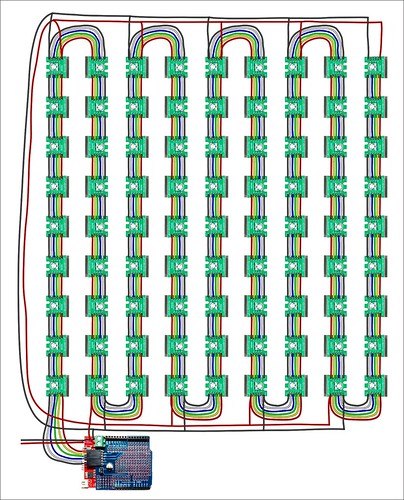 The controller is housed in simple wooden box with a 7.5VDC 8A power supply from Jameco. The ShiftBrite code is running on a Seeeduino (Arduino compatible). 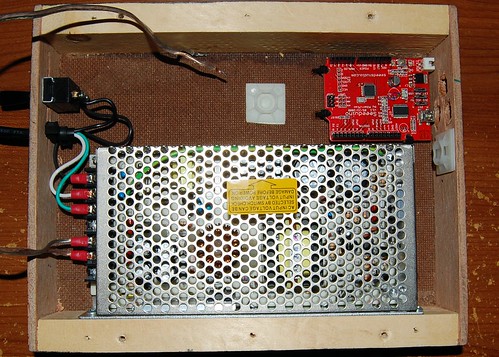 First on the stack is a ShiftBrite Shield, which simply provides a quick way to wire up power and data to a ShiftBrite chain. 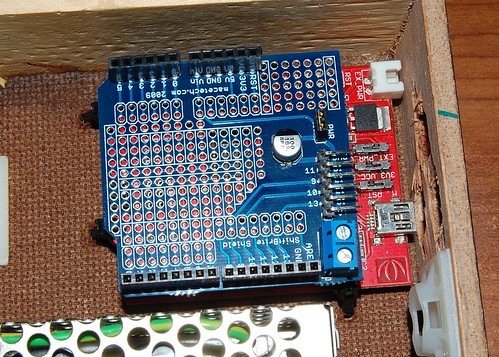 Second on the stack is a prototype Bluetooth Shield. This is a new product we'll have available soon, it provides a serial connection to a computer over Bluetooth. Keep an eye on the macetech.com store, we'll have a few prototypes up for sale very soon. There are a couple of transistor-based level converters, since the Bluetooth module runs on 3.3V. Of course there's a 3.3V regulator as a well. The shield can be wired to any of the pins on the Arduino. Right now we're using NewSoftSerial on pins 4 and 5. It can be attached to the hardware RX and TX pins, but interferes with programming. 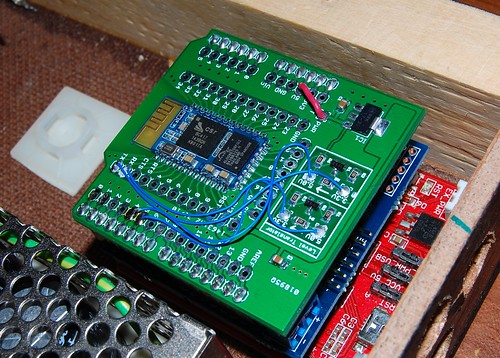 Controller CodeThe code running on the Seeeduino was developed in Arduino 0018 and is a basic ShiftBrite example with some parsing of the input from the Bluetooth module using NewSoftSerial. The control protocol is very similar to the Mini-SSC servo control protocol: each packet starts with 255, then the x and y coordinates of a pixel, and the RGB values up to 254 each (since 255 restarts a packet). A more compact protocol could be developed, but this is pretty flexible for remote control and we don't need a very fast update rate for this application.
#include <math.h>
#include <NewSoftSerial.h>

NewSoftSerial bt(4,5);

#define clockpin 13 // CI
#define enablepin 10 // EI
#define latchpin 9 // LI
#define datapin 11 // DI

#define NumLEDs 81

unsigned long SB_CommandPacket;
int SB_CommandMode;
int SB_BlueCommand;
int SB_RedCommand;
int SB_GreenCommand;

int LEDChannels[9][9][3] = {0};

void setup() {

   pinMode(datapin, OUTPUT);
   pinMode(latchpin, OUTPUT);
   pinMode(enablepin, OUTPUT);
   pinMode(clockpin, OUTPUT);
   SPCR = (1<<SPE)|(1<<MSTR)|(0<<SPR1)|(0<<SPR0);
   digitalWrite(latchpin, LOW);
   digitalWrite(enablepin, LOW);
   bt.begin(57600);

   WriteLEDArray();

}

void SB_SendPacket() {

    if (SB_CommandMode == B01) {
     SB_RedCommand = 120;
     SB_GreenCommand = 90;
     SB_BlueCommand = 90;
    }

    SPDR = SB_CommandMode << 6 | SB_BlueCommand>>4;
    while(!(SPSR & (1<<SPIF)));
    SPDR = SB_BlueCommand<<4 | SB_RedCommand>>6;
    while(!(SPSR & (1<<SPIF)));
    SPDR = SB_RedCommand << 2 | SB_GreenCommand>>8;
    while(!(SPSR & (1<<SPIF)));
    SPDR = SB_GreenCommand;
    while(!(SPSR & (1<<SPIF)));

}

void WriteLEDArray() {

    SB_CommandMode = B00; // Write to PWM control registers

    for (int h1=1;h1<10;h1++) {
      int h3 = 0;
      for (int h2=0;h2<9;h2++) {

        if (h1 % 2) {
          h3 = h2;
        } else {
          h3 = 8-h2;
        }

        SB_RedCommand = LEDChannels[h1-1][h3][0];
        SB_GreenCommand = LEDChannels[h1-1][h3][1];
        SB_BlueCommand = LEDChannels[h1-1][h3][2];
        SB_SendPacket();
      }
    }

    delayMicroseconds(10);

    PORTB |= (1 << 1);
    PORTB |= (1 << 2);
    delayMicroseconds(10);
    PORTB &= ~(1 << 2);
    PORTB &= ~(1 << 1);


    SB_CommandMode = B01; // Write to current control registers
    for (int z = 0; z < NumLEDs; z++) SB_SendPacket();

    delayMicroseconds(10);

    PORTB |= (1 << 1);
    delayMicroseconds(10);
    PORTB &= ~(1 << 1);

}

void clearAll() {

  for (int j1 = 0; j1 < 9; j1++) {
    for (int j2 = 0; j2 < 9; j2++) {
      LEDChannels[j1][j2][0] = 0;
      LEDChannels[j1][j2][1] = 0;
      LEDChannels[j1][j2][2] = 0;
    }
  }

  WriteLEDArray();

}

int inIndex = 999;

byte inX = 0;
byte inY = 0;
byte inR = 0;
byte inG = 0;
byte inB = 0;
byte inByte = 0;
byte updateCnt = 0;

void loop() {

  updateCnt++;
  if ((updateCnt > 20) && (inIndex >= 999)) {
    WriteLEDArray();
    updateCnt = 0;
  }

  if (bt.available() > 0) {

    inByte = bt.read();

    if (inByte == 255) {

      inIndex = 0;

    } else {

      if (inIndex == 0) {
        if (inByte == 254) {
          WriteLEDArray();
          inByte = 0;
          inIndex = 999;
        } else if (inByte == 253) {
          clearAll();
          inByte = 0;
          inIndex = 999;
        } else {
          inX = inByte;
        }
      } else if (inIndex == 1) {
        inY = inByte;
      } else if (inIndex == 2) {
        inR = inByte;
      } else if (inIndex == 3) {
        inG = inByte;
      } else if (inIndex == 4) {
        inB = inByte;
        LEDChannels[8-inX][inY][0] = inR*4;
        LEDChannels[8-inX][inY][1] = inG*4;
        LEDChannels[8-inX][inY][2] = inB*4;
      }

      inIndex++;
    }

  }

}
Twitter Interface CodeThe Java code below for Twitter interfacing was all written by Jason since he's a lot better at XML and REST and other stuff I don't understand. --- GarrettJason: This project posed two new technical challenges from a coding standpoint. First, we needed to be able to write data out to a serial port (to be transmitted over Bluetooth). Secondly, we needed to get pixel data from Twitter posts. Parsing XML is really slick using Groovy, so I decided to write the code with Groovy/Java on my trusty MacBook Pro and then port it to Garrett's little Linux Eee PC (running Ubuntu 9.10 Netbook Remix) for the final setup. Serial Transmission over BluetoothSetting up the Bluetooth device on my MacBook Pro running OSX was easy enough: open Bluetooth preferences, click on the "(+)" button to add a device, hit continue, select "Any device", Continue, select the device, Continue, type in the pass code, etc. Once the device is set up, you can click on the connection, click on the gear and "Edit serial ports" to view the serial port service and the path (such as "/dev/tty.EPBMX-COM-DevB-1"). Garrett: On Linux, the process is similar but it will vary depending on the distribution you use. On Ubuntu 9.10 the default Bluetooth manager is next to useless for connecting to any device that isn't a phone or keyboard. The serial Bluetooth module we're using requires a PIN of 1234, and the Ubuntu Bluetooth manager appears to have options to let you send a "0000", "1111", "1234" or a custom number. That only works for "0000", if you choose any other option, it generates a random number that you're supposed to type in on your (keypadless) device. The simple solution is to get rid of the default Bluetooth manager and install Blueman. Using "sudo apt-get install blueman" should be adequate. This just works. You click on the applet icon, find the device, try to "bond" it, and it will ask for your PIN. Then click on the device and choose the Serial Ports list and click the only serial port available. Now your serial port is available on /dev/rfcomm0. Depending on distribution again, you may need to add yourself to the same group as the serial port, or change permissions of /dev/rfcomm0. Jason: Getting Java to write to a serial port was not so easy for me. Java is platform-independent, so I needed to use a hardware-specific library to get things working. To make a long story short, using the RXTX JAR with the correct Java Native Interface library (librxtxSerial.jnilib) was the best option. Here are some of the resources I used:
At one point I was getting a gnu.io.PortInUseException. This had something to do with permissions for the folder where lock files are kept. It turned out this folder was not created, so I ran "sudo mkdir /var/lock" and "sudo chmod 777 /var/lock". The RXTX library takes cares of removing stale lock files. I made a quick Java helper class that allowed me to write out to the table using the protocol Garrett created (download SerialWriter.java). The RXTXcomm.jar needs to be included in the class path and librxtxSerial.jnilib needs to be included in the Java library path. I did this by including the library in my working directory setting the Java virtual machine parameter ("-Djava.library.path=.").
package com.macetech;

import gnu.io.CommPortIdentifier;
import gnu.io.SerialPort;
import gnu.io.UnsupportedCommOperationException;
import gnu.io.PortInUseException;

import java.io.*;
import java.util.*;

public class SerialWriter {
   protected static long CLOSING_SLEEP_SECONDS = 2;
   protected static long WRITE_SLEEP_MILLIS = 100;

   public static byte[] COMMAND_PACKET_START = new byte[]{(byte)255};
   public static byte[] COMMAND_PACKET_STOP = new byte[]{(byte)255, (byte)254};
   public static byte[] COMMAND_FULL_CLEAR = new byte[]{(byte)255, (byte)253};

   protected SerialPort mSerialPort = null;
   protected OutputStream mOutputStream = null;

   public boolean init(String portName) {
      mSerialPort = getSerialPort(portName);

      if (mSerialPort != null) {
         try {
            mSerialPort.setSerialPortParams(57600,
             SerialPort.DATABITS_8,
             SerialPort.STOPBITS_1,
             SerialPort.PARITY_NONE);
            mSerialPort.notifyOnOutputEmpty(true);
         }
         catch (UnsupportedCommOperationException e) {
            System.out.println(e);
         }

         mOutputStream = getOutputStream(mSerialPort);

         if (mSerialPort != null && mOutputStream != null) {
            return true;
         }
         else {
            return false;
         }
      }
      else {
         return false;
      }
   }

   public void close() {
      try {
         Thread.sleep(CLOSING_SLEEP_SECONDS * 1000);
      }
      catch (InterruptedException e) {
         e.printStackTrace();
      }

      try {
         mOutputStream.close();
      }
      catch (IOException e) {
         e.printStackTrace();
      }

      mSerialPort.close();
   }

   protected SerialPort getSerialPort(String portName) {
      SerialPort serialPort = null;

      CommPortIdentifier portId = getSerialPortIdentifier(portName);

      if (portId != null) {
         try {
            serialPort = (SerialPort)portId.open("SimpleWrite", 2000);
         }
         catch (PortInUseException e) {
            System.out.println("Port in use.");
         }
      }

      return serialPort;
   }

   protected CommPortIdentifier getSerialPortIdentifier(String portName) {
      CommPortIdentifier portId = null;

      Enumeration portList = CommPortIdentifier.getPortIdentifiers();

      while (portList.hasMoreElements()) {
         portId = (CommPortIdentifier)portList.nextElement();
         if (portId.getPortType() == CommPortIdentifier.PORT_SERIAL
            && portId.getName().equals(portName)) {
            return portId;
         }
      }

      return portId;
   }

   protected OutputStream getOutputStream(SerialPort serialPort) {
      OutputStream outputStream = null;

      try {
         outputStream = serialPort.getOutputStream();
      }
      catch (IOException e) {
         System.out.println(e);
      }

      return outputStream;
   }

   protected boolean writePacketAndSleep(byte[] bytes, long sleepMillis) {
      try {
         mOutputStream.write(bytes);
      }
      catch (IOException e) {
         e.printStackTrace();
         return false;
      }

      try {
         Thread.sleep(sleepMillis);
      }
      catch (Exception e) {
         System.out.println(e);
      }

      return true;
   }

   public boolean writePacketStart() {
      return writePacketAndSleep(COMMAND_PACKET_START, 0);
   }

   public boolean writePacket(byte[] bytes) {
      return writePacketAndSleep(bytes, 0);
   }

   public boolean writePacketStop() {
      return writePacketAndSleep(COMMAND_PACKET_STOP, WRITE_SLEEP_MILLIS);
   }

   public static void main(String[] args) {
      SerialWriter writer = new SerialWriter();
      if (!writer.init("/dev/tty.EPBMX-COM-DevB-1")) {
         System.out.println("Could not connect to serial port");
      }
      else {
         System.out.println("Succesfully connected to serial port");

         System.out.println("Writing data");

         for (int i = 0; i < 100; i++) {
            byte x = (byte)(Math.random() * 9);
            byte y = (byte)(Math.random() * 9);

            byte r = (byte)(Math.random() * 255);
            byte g = (byte)(Math.random() * 255);
            byte b = (byte)(Math.random() * 255);

            if (Math.random() * 10 < 3) {
               r = 0;
               g = 0;
               b = 0;
            }

            if (writer.writePacketStart()) {
               writer.writePacket(new byte[]{x, y, r, g, b});
            }
            writer.writePacketStop();

         }

         System.out.println("Finished writing data");

         writer.close();
      }
   }
}
TwitteringsUsing the Twitter API was very easy, especially using Groovy to send requests and parse responses from their REST service. I looked into using Twitter4J, which was nice but not necessary for the simple tasks we needed to complete. The following Groovy code (download TwitterTable.groovy) connects to the LED table, makes Twitter search requests for "#ledtable", parses XML response, and uses a regular expression to extract pixel information, then writes the pixels to the table. Then, it waits 30 seconds and starts the Twitter search process again, due to the 150 request-per-hour Twitter rate limit.
package com.macetech

import java.net.URL
import java.util.regex.Pattern
import java.util.regex.Matcher
import groovy.util.slurpersupport.GPathResult
import java.text.SimpleDateFormat

public class TwitterTable {

   static colorMap = ["black": "000000", "red": "ff0000", "green": "00ff00",
    "blue": "0000ff", "yellow": "ffff00", "cyan": "00ffff", "magenta": "ff00ff",
    "gray": "c0c0c0", "grey": "c0c0c0", "white": "ffffff"]
   static godAuthors = ["jdmounge (Jason Moungey)", "Macetech (macetech LLC)",
    "macegr (Garrett Mace)"]
   static Pattern pixelPattern = Pattern.compile(
    ".*?([0-8]),([0-8]),([0-9A-F]{2})([0-9A-F]{2})([0-9A-F]{2}).*?",
    Pattern.MULTILINE | Pattern.DOTALL);
   static int SEARCH_SLEEP_SECONDS = 30

   boolean serialTestMode = false
   SerialWriter serialWriter = null
   def processedEntries = []    // list of IDs
   File logFile = null

   public static void main(String[] args) {
      /*
         - allow people with authority to send clear command
         - figure out timing for replaying tweets if no request are coming in
         - write the information out as XML so the same parsing algorithm can be used
       */

      TwitterTable ts = new TwitterTable()
      ts.serialTestMode = args && args[0] != null && args[0] == "test"
      if (ts.init()) {
         ts.run()
         ts.close()
      }
   }

   boolean init() {
      if (serialTestMode) {
         println "Running serial connection in test mode (skipping all commands)"
      }
      else {
         serialWriter = new SerialWriter()
         if (!serialWriter.init("/dev/tty.EPBMX-COM-DevB-1")) {
            println "Could not connect to serial port - quitting"
            return false
         }
         println "Succesfully connected to serial port"

         serialWriter.writePacket(SerialWriter.COMMAND_FULL_CLEAR)
      }

      String fileName = "twitter-table-${
         new SimpleDateFormat("yyyyMMdd-HHmmss").format(new Date())}.log"
      logFile = new File(fileName)
      logFile.withWriterAppend {
         it.append("<?xml version="1.0" encoding="UTF-8"?>n<feed>")
      }

      return true
   }

   def close() {
      if (!serialTestMode) {
         serialWriter.close();
      }

      logFile.withWriterAppend {
         it.append("</feed>n")
      }
   }

   def run() {
      while (true) {
         print "nChecking for new tweets..."
         def responseText = new URL(
            "http://search.twitter.com/search.atom?q=%23ledtable&rpp=100").text
         println "complete"

         //println("${responseText}n")

         GPathResult entries = new XmlSlurper().parseText(responseText).entry
         println "Retrieved ${entries.size()} tweets"
         entries.iterator().reverse().each { entry ->
            processEntry(entry)
         }

         printRateLimitStatus()
         Thread.sleep(SEARCH_SLEEP_SECONDS * 1000)
      }
   }

   def processEntry(GPathResult entry) {

      // only process entries that have not been processed
      if (!processedEntries.contains(entry.id)) {
         processedEntries << entry.id

         //println("parsing: ${entry.title}n")
         println(["", entry.published, entry.author.name].join("n"))

         // write log file in format that can use the same parser
         logFile.withWriterAppend {
            it.append("<entry>n")
            it.append("  <id>${entry.id}</id>n")
            it.append("  <published>${entry.published}</published>n")
            it.append("  <author>n")
            it.append("    <name>${entry.author.name}</name>n")
            it.append("    <uri>${entry.author.uri}</uri>n")
            it.append("  </author>n")
            it.append("  <title>")
         }

         // convert color words to hex
         String post = entry.title
         colorMap.each { key, value ->
            post = post.replace(key, value)
         }

         if (post.contains("clear") && godAuthors.contains(entry.author.name)) {
            if (!serialTestMode) {
               serialWriter.writePacket(SerialWriter.COMMAND_FULL_CLEAR)
            }

            println("clear");
            logFile.withWriterAppend {
               it.append("clear")
            }
         }
         else {
            // only keep valid characters; max color value is FE to maintain protocol
            post.toUpperCase().replaceAll("[^0-9A-F,;]", "")
               .replaceAll("FF", "FE").split(";").each {
               Matcher m = pixelPattern.matcher(it);
               if (m.matches() && m.groupCount() == 5) {

                  byte x = Integer.parseInt(m.group(1))
                  byte y = Integer.parseInt(m.group(2))
                  byte r = Integer.parseInt(m.group(3), 16)
                  byte g = Integer.parseInt(m.group(4), 16)
                  byte b = Integer.parseInt(m.group(5), 16)
                  byte[] bytes = [x, y, r, g, b];

                  println("x,y,r,g,b=" + x + "," + y + "," + m.group(3) + ","
                     + m.group(4) + "," + m.group(5));

                  logFile.withWriterAppend {
                     it.append("${x + "," + y + "," + m.group(3)
                        + m.group(4) + m.group(5)};")
                  }

                  if (!serialTestMode) {
                     if (serialWriter.writePacketStart()) {
                        serialWriter.writePacket(bytes);
                     }
                     else {
                        println "ERROR writing packet"
                     }
                     serialWriter.writePacketStop();
                  }
               }
            }
         }

         logFile.withWriterAppend {
            it.append("</title>n")
            it.append("</entry>n")
         }
      }
   }

   def printRateLimitStatus() {
      def xml = new XmlSlurper().parseText(
         new URL("http://api.twitter.com/1/account/rate_limit_status.xml").text)
      println "nRemaining hits: ${xml.'remaining-hits'}"
      //println "Hourly limit: ${xml.'hourly-limit'}"
      //println "Reset time: ${xml.'reset-time'}"
      //println "Reset time (seconds): ${xml.'reset-time-in-seconds'}"
   }
}
That's it!We've described one way you can put a microcontroller-based device online. Since it uses Bluetooth, it's possible to have multiple wireless devices connected to one computer, scattered around an area and monitoring different things. We've had ideas for server status, online store activity, email notification, etc. Bluetooth is a two-way medium so the remote device could also be capturing data. As people use technology in more areas of their lives, ambient display of various pieces of data will become more important.What do you think about this project? We'd like to hear your ideas for improving this project, or maybe ideas for completely different applications. Please leave a comment below! Submitted by Garrett on Tue, 02/23/2010 - 00:01. |
Cool Links 
Recent Comments
|

hi everybody, please let us
hi everybody, please let us know what you think. we are looking to make improvements. thanks!
Thanks for posting. I'd
Thanks for posting. I'd like to play around with the concept, but I've never done anything like this. Would you mind providing an estimated cost of the materials?
A little over $300 for the
A little over $300 for the ShiftBrite modules, $25 for the Arduino, $10 for the ShiftBrite Shield, less than $40 for the Bluetooth Shield that macetech will be selling soon, something like $150 for the table, and another $50 or so for the power supply and random construction. All told, about $600 and a bunch of hard labor :)
Great write up, thanks for
Great write up, thanks for sharing!
Awaiting a small order of shiftbrites and excited to start experimenting!
It is awesome, Thanks for
It is awesome, Thanks for the sharking!
Thanks for the show guys! I
Thanks for the show guys! I finally managed to tell my GF how I feel about her (for the umpteenth time). =)
Omer
what's the size of the table
what's the size of the table you used?
check out an easy way to
check out an easy way to generate tweets for the table here: http://ledtable.cyberstalk.me/ (credits in the blog post above)
Hello there, I am going to
Hello there,
I am going to be tackling something like this for a reactive interactive wall! Thankyou so much for the inspiration. 1 little question though...
"Power is wired into various points since the full power of the array shouldn't go through the cables and traces of the first ShiftBrites."
Can you ellaborate on this a bit more? The info would be greatly appreciated.
Thanks in advance :)
Nick
Nice post!
Nice post!
Looks fantastic but it seems
Looks fantastic but it seems difficult to make! But with hardwork and perseverance I know anyone can make it. Thanks for this, it is very informative. make him love me